 Hello. My name is Jaime M. Valdez. This website will chronicle the building of my latest
railroad. My 1" scale, 4 3/4" gauge, railroad has been under construction since Thanksgiving 2003.
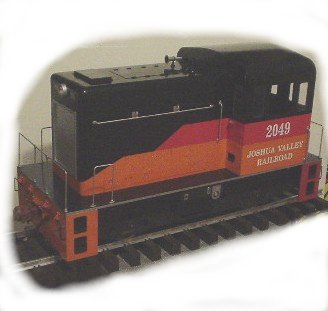
It is named The Joshua Valley RailRoad after my grandson. The trains seem just barely large
enough to ride. I have about 625 feet of track on a loop to loop layout around the house for a grand
total of 1250 feet of mainline running. This project was supposed to be done by Spring Break 04, but
as of the 4th of July I still have not put the ballast down. I have completed the locomotive and both
gondolas that came in the starter kit from Riding Railkits.
Hopefully, the railroad will include at least one steam powered locomotive before too long.
However, since the cost of a 1" scale GS4 is outside this modelers range of expense and won't run on
an 11' radius curve I'll have to settle for something considerably smaller.
Hello. My name is Jaime M. Valdez. This website will chronicle the building of my latest
railroad. My 1" scale, 4 3/4" gauge, railroad has been under construction since Thanksgiving 2003.
It is named The Joshua Valley RailRoad after my grandson. The trains seem just barely large
enough to ride. I have about 625 feet of track on a loop to loop layout around the house for a grand
total of 1250 feet of mainline running. This project was supposed to be done by Spring Break 04, but
as of the 4th of July I still have not put the ballast down. I have completed the locomotive and both
gondolas that came in the starter kit from Riding Railkits.
Hopefully, the railroad will include at least one steam powered locomotive before too long.
However, since the cost of a 1" scale GS4 is outside this modelers range of expense and won't run on
an 11' radius curve I'll have to settle for something considerably smaller.
Anybody interested in 1" scale trains, either live steam or diesel, are welcome to contact me by E-Mail. This is a private railroad on private property, but I hope to generate enough interest in the area to possibly start a group or club. I have included a few pictures and descriptions of current construction.
 I would like to take this time to include links to the companies I do business with
regarding the JVRR. These companies have provided World Class Service and have gone out of their way
to answer any questions I might have. I would also like to thank John R. Yells for his assistance
with the website. You can visit his 1" scale railroad website at
Gecko Belt & Sandy Flats RR.
I would like to take this time to include links to the companies I do business with
regarding the JVRR. These companies have provided World Class Service and have gone out of their way
to answer any questions I might have. I would also like to thank John R. Yells for his assistance
with the website. You can visit his 1" scale railroad website at
Gecko Belt & Sandy Flats RR.
![]()
![]()
Phase I - The locomotive and gondolas were completed in February 2004.
Phase II - The large loop roadbed trenching and track placement was completed in April 2004.
Phase III - The small loop roadbed trenching and track placement was completed in May 2004.
Phase IV - The backyard roadbed trenching and track placement was completed in July 2004.
Phase V - 1250' of border to hold the ballast in. Approximately 40% complete.
Phase VI - Ballast the track.
Phase VII - Shed modification and storage track installation.
Phase VIII - Landscaping. (By order of the Chairman of the Board)
I actually got a little ahead of myself and completed about 80' of the backyard track work so that Joshua and I could take a ride on the newly completed loco and gondolas back in February. I have run the switcher continuously with very few derailments. Most of my trouble is uneven track caused by the lack of ballast. A problem soon to be solve with the addition of the border and ballast. There is a 625' loop to loop of track on the ground with 3 turnouts in place. Two turnouts for the return loops and one will lead to the storage track that will end up in the shed.
I spend a little time on the Internet getting as much helpful information as I can from fellow Live Steamers on the best ways to do things. Building a railroad layout is normally a continuous process, however, this one is on limited real estate, time, and finances. Besides, the Chairman of Board has spoken again and informed all that there will be NO expansion of the right-of-way. We'll see.

My first engine is a battery powered diesel switcher unit from Riding Railkits. It came as a easy to build kit. It needed no machining or welding to complete. Basically drilling and tapping holes, assembly, and painting. I later added the detail kit and the sound system. It has been completely finished and can been seen at the top of this page and on Page 1. It turned out better than I thought it would.
I originally obtained the Riding Railkits Switcher Starter Set that included 2 gondola cars with trucks and couplers and a 40' circle of track. The 2 gondolas will be used as riding cars.
I wish I could parrot what everybody else says about "grades and elevations were recorded using a surveyor's level or transit" but to tell you the truth, I got lucky. I don't have more than 1 foot of elevation change over the entire lot. After the right of way was determined, I used a tape measure to determine distances and locations of all curves. Since I used a Ryobi Cultivator attachment to trench out the 12" wide road bed, any change of elevation will be minor and adjustable within the 2" to 3" deep trench filled with ballast. The ruling grade will be less than 1%. Unfortunately because of space constraints, all curves are 12 foot radius with the exception of the small loop which is 11 foot radius.
The track as purchased consists of 9' panels with 6 ties per foot. In order to complete the railroad within budget and because I have more time than I have money, I opted to eliminate 2 out of every 6 plastic ties. This reduction in support was discussed with the Riding Railkits personnel and we determined it would not be detrimental to the support required. To reduce cost even further I replaced every other plastic tie with a wood tie and steel clips. I did some rail and fishplate shopping and found Real Trains to be very competitive with their pricing. I duplicated the tie arrangement on the additional rail and I was able to drop the price from $6.50 per foot to about $3 for the track panels.
Although a rail stagger was not used to start with, the curves generated their own unintentional rail stagger. The rail is 1/2" wide at the base, 1/2" high and 1/4" wide at the top. Other than the aluminum color, it looks just like the real thing.
Although 1" scale gauge is normally 4.75", the Riding Railkits prefab plastic ties are gauged at 4 51/64". This gauge is used to allow the track panels, once assembled, to be used as straight or curved track panels. The nominal track gauge used on the JVRR is 4-51/64".
The driving force behind this project was the 4-wheel switcher kit purchased from Riding Railkits. The starter kit includes one 4-wheel switcher kit, 2 Gondola Kits, assembled trucks and couplers, 126' of Pre-fab 4 3/4"gauge track and rail joiners (makes a 40' diameter circle of track). I also purchased from them the rail clips needed for the additional track panels, 2 optional seats, 2 gondola detail kits, 1 locomotive detail kit, 1 locomotive sound system, and 3 switch kits.
Additional rail (1000 feet) and rail joiner sets were purchased from Real Trains. I also purchased a rail gauge tool and a switch stand from them.
A black weed stop cloth is used in the roadbed trench. The weed stop cloth is purchased, from LOWE'S, garden department on a 100' roll 3' wide. I cut the roll into 3, 1' wide rolls.
For the wood ties I purchased 1"x 4" pressure treated wood in 8' lengths, from LOWE'S, for ease of delivery and handling. Ripping them to 1" using an old 10" Sears table saw was easy. I managed 33, 8 1/2" ties per length of wood. I used a piece of steel strap to make a drill jig in order to pre-drill all the ties for the #4 woodscrews that hold the rail clips.
A wood border made from replaced privacy fence panels is used to hold the ballast in the road bed. The fence panels were first disassembled and some of the slats cut into 6"pieces. These are in turn hammered (?) into the ground to form the side walls of a 12"wide trench that is the roadbed. I do this only on the curves. (As I mentioned before, I have more time than I have money.) I use uncut 6' long slats to border the straight sections of the track.
Roadbed and ballast material is a #89 crushed granite 3/8" diameter (called 3/8 minus). The crushed granite is about 2" to 3" deep and track is then floated up through the ballast.
| LINK to PAGE | DESCRIPTION |
| Page 1: | Locomotive and Rolling Stock |
| Page 2: | Test run and first passenger. |
| Page 3: | Empty. |
| Page 4: | A plan map of the Joshua Valley RailRoad and photo tour. |
| Page 5: | Second page of photo tour. |
| Page 6: | Third page of photo tour |
| Page 7: | Fourth page of photo tour. |
| Page 8: | Fifth page photo tour and where the JVRR is located. |
| Links: | My favorite Live Steam places. |
| Guest book: | Sign my guest book before you leave |
|
|
|
| spdaylight4449@yahoo.com |
|
| <<<BACK | JVRR Home Page | NEXT>>> |
Last Updated: 08-14-04
